🧾 What is a Lead?
A Lead is an entry where you store unprocessed contact details. These contacts might come from different places like your website, phone calls, referrals, social media, ads, or emails. You haven’t started working on them yet — they’re just raw data for now.
🎯 Purpose of the Leads Module
The Leads section is used to:
- Store new or unverified contact information.
- Start working on them when you’re ready.
- Convert interested contacts into Prospects for further follow-up.
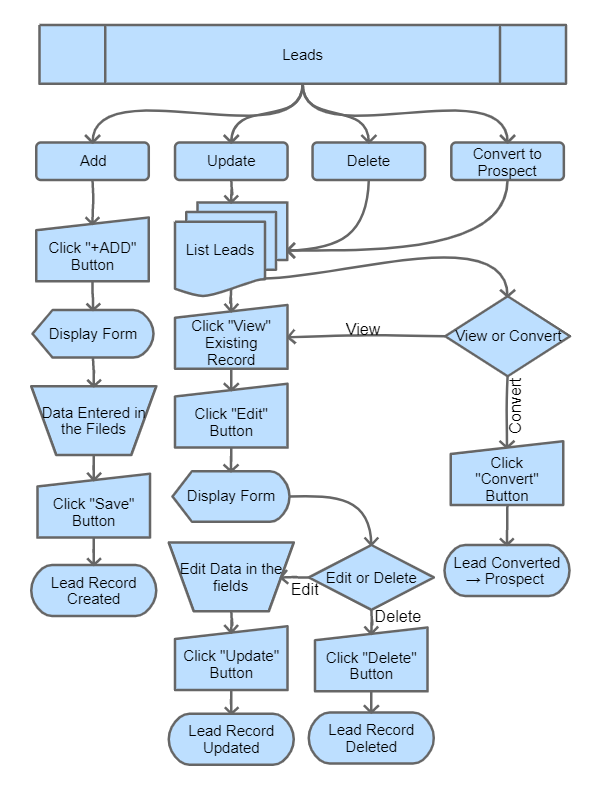
🛠️ Main Actions in the Leads Module
- Add or edit leads (single or bulk).
- Assign a lead to a specific employee (Lead Owner).
- Bulk-import leads from a CSV/Excel sheet using the import dialog.
- Export the lead list to CSV/Excel for offline review or sharing.
- Convert the lead into a Prospect using the Convert Lead action — works on a single lead or on many leads at once via the multi-select checkbox + Action menu.
⏱️ When Should You Create a Lead?
- At the time of creating a new lead:
- Add as much information as available from the start (from a form, call, referral, etc.).
- Minimum required: Name, Phone or Email, and Lead Source.
- Later during qualification:
- As you contact the lead and gather more info, you can update Designation, Address, Company Number, Tax ID, etc.
- Add attachments or internal notes as you go.
- Before converting to Prospect, ensure:
- You have the key identifiers (Name, Company, Contact Info).
- You can confidently assign the lead to a sales rep.
- You’re ready to begin follow-up cycles.
✅ Information Required to Create a Lead
Follow these steps to add a new lead:
- Go to the Leads section from the left-side menu.
- Click the Add button (top-right of the grid).
- Fill in the following details in the form:
- Date
- Lead Source (e.g., Facebook, Website, Call, Referral)
- Lead Owner (employee responsible for the lead)
- Name, Designation, Company Name
- Phone Number, Mobile Number, Email
- Website, Company Number, Tax ID (if any)
- Full Address (Street, City, State, Country, Pin Code)
- Upload documents if you have any (business card, intro deck, etc.)
- Click the Save button at the bottom.
Your lead is now saved in the system and will appear in the Leads list.
📥 Bulk Import & Export
- Import: Use the import dialog on the Leads list to upload a CSV/Excel of leads. Download the sample template, fill in the columns (the sample lists every valid value for dropdown columns like Lead Source), then upload. Errors are reported row-by-row before anything is saved.
- Export: Export the current grid (with filters/search applied) to CSV/Excel for offline review or sharing.
⚙️ Lead Source dropdown values
Lead Source values are managed at Settings > Dropdown Settings, then pick the Lead category and edit its Lead Source options. You cannot delete a value already used on a saved lead, but renaming it updates every linked record.